Secureboot - CSCG2022
Category: Pwn
Difficulty: Hard
Author: localo
Recon
We are given a zip file, secureboot.zip, containing a server.py script, and a folder called testsigned_images.
From a first look, the server.py script allows you to submit a signed bootloader image for it to run under qemu.
Further down we can see our goal. The flag is being inserted as a disk, here disk number 3.
So our goal is presumably to read the contents of this third disk, and get it back to us.
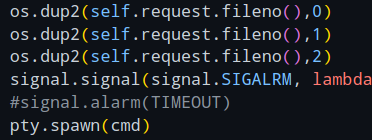
At first we can make some modifications to this script to make debugging locally easier.
First, let's comment out the timeout signal, so we don't get surprised by it while working.
To do this, commenting out the signal.alarm line suffices
Next, since we'll most likely be working with the code inside of qemu, we should make it accept gdb connections.
For this I like to add the commandline parameters -s -S to the qemu call.
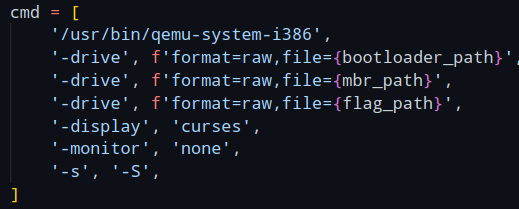
Lastly, let's look at this qemu command again.
It inserts 3 disks into the machine, a bootloader, an mbr, and the flag.
The first argument is the bootloader, which is a file we do not have in the zip file.
This bootloader most likely checks if the signature on the image we provide is correct.
Because we don't have it locally, let's comment it out too.
Then comes the MBR, the image we supply.
As we need an image that is signed correctly, the zip came with 4 images already pre-signed for us.

Notice the size of 520, a usual MBR bootsector would be 512 bytes, so we have 8 bytes more than normal.
These 8 bytes probably store the signature.
The source code for all 4 images are given in the description of the challenge:
Tetros is from https://github.com/daniel-e/tetros and the other three are from https://github.com/nanochess.
So, we know our goal, somehow reading this third disk image, and doing that with any of the four presigned programs.
To achieve this we could try to load one of the presigned programs, then exploit it to gain code execution, to then read the disk image.
For that, we'll have to look at the presigned programs themselves, to see if we can find an exploit in one of them.
Our options are 3 games (flappy bird, tetris and lights), and a BASIC interpreter.
BASIC is a pretty old programming language, created back in 1964, and this one seemed to be the most interesting image of them all.
A language interpreter is bound to be more complex than the three games, and will also have to take full text input, while the games probably handle input key by key.
This makes memory corruption way more likely, so lets look at the BASIC image.
The code is written in assembly, and can be found in the basic.asm file.
To understand the memory corruption exploit that can be found in this image, we'll have to make ourselves a mental image of the memory layout.
The compiled image will be placed at the address 0x7c00, as seen in line 148.
Other important memory locations are named right after, including something we'll be interested in, our own input at 0x7e80.
So, the thing to keep in mind is that our line is placed after the code that is described in the assembly here.
Now that we're aware of where things are in memory, let's look at the code that actually reads our line of text we enter.
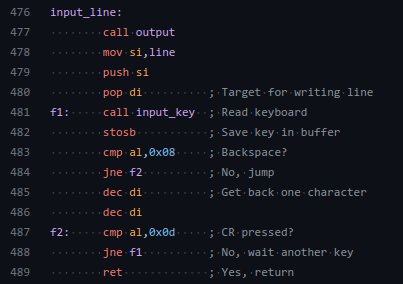
This input_line function seems to do exactly that.
It first gets the location where to put the input (0x7e80), reads 1 character, and does some checks.
First, if the key is a backspace, decrease the input pointer by one, and with that overwrite the character the user wanted to remove.
The second check checks for a so-called CR, a Carriage Return, here the Enter key, to see when to finish reading a text line.
So let's say we enter print "Test"[CR], lets imagine [CR] is the enter key, then we would add the characters one by one to the line location.
So, put p at location 0x7e80, r at location 0x7e81 etc etc.
How does this look like with the backspace key?
Lets say we enter q[BACKSPACE]print.
This will put q at location 0x7e80, see the backspace, so set the line pointer back to 0x7e80, so we can then set the intended print at location 0x7e80, as if the q never was entered.
This allows for something weird to happen though.
What happens if enter backspace, without entering any text beforehand?
Well, the function would see the backspace, and set the pointer to 0x7e7f.
This is an issue, because the next character we type in doesn't get put at it's intended location 0x7e80, but rather 0x7e7f, exactly one byte before the intended location.
We can extend this to as many backspaces as we want, for example send 16 backspaces to go back 16 characters, putting our line at 0x7e70.
If you still have the memory layout from before in mind, you'll notice that we could theoretically send so many backspaces that we set the line pointer back to 0x7c00, letting us overwrite the code there!
Though it's not that easy, if we override code that is used to read the line itself we won't get all of our injected code into memory fast enough.
To that, we will have to somehow jump to our injected code after we're done injecting it.
But for that, we have a nice and simple way baked into the program.
Directly at the end, we have this table of statements.
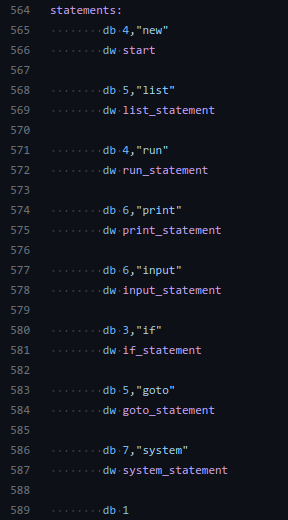
The way this program interprets the language is by looking up the keyword you used in this statements table, to then redirect code execution to the correct function.
If we backtrack with our backspaces enough to land in this table, we could add our own statement entry, to then enter the statement and redirect code execution.
Exploitation
Nice, so our current plan:
1) load the bootBASIC image.
2) backtrack into the table of statements.
3) add custom statement that jumps somewhere into our line.
4) put code that reads the disk number 3 to print it out at this location.
5) enter the statement, and get the flag.
Though, sadly, after some testing, we will realize that this won't just directly work.
If we try to send our shellcode to the server, we will quickly see that some of our characters dont get sent properly.
On closer inspection, all characters that are above the ascii range 0x80 will not reach our target.
This happens because the assembly bootloader code is designed to receive input from a keyboard, not a server connection, and qemu respects that.
As such we can only send characters that we can actually type with our keyboard (and some more control characters), but no more.
This presents a problem, how do we send shellcode to the machine in a way that only uses valid characters?
Turns out, there's ways to "transform" any kind of shellcode into ascii-only shellcode.
One great example is this tool called PolyAsciiShellGen, which takes any shellcode and generates ascii shellcode from it.
We cannot use this tool though, as it works primarily on 32bit code, and in the bootloader we work with 16bit code.
As I found nothing for it, I decided to make my own generator for it.
The code for it can be found here.
Don't be intimidated by the size of the code, most of it is the definition of a table that I generated with the appended get_path_for function.
The code basically takes the original shellcode with the disallowed characters in it, and processes it by every 2 characters.
Let's say we have the characters 0x41, 0x42, and let's say they're disabled characters.
The generator will now clear the ax register to 0 first.
Then, it will modify ax to the 2 characters we want with some clever substraction instructions.
For example here, we can substract 0xbcbc from 0x0.
Because of something called Integer Underflow, this substraction is seen as 0x10000 - 0xbcbc, which results in our wanted bytes.

With many of these substractions, we can split them up in a way that allows us to only use valid characters.
Now ax contains our wanted value, but how do we place it in memory now?
This is done by simply pushing the variable onto the stack.
We can control the location of the stack by poping any value we want into it, and as such can write ax anywhere we want.
So this is that issue fixed!
Next issue: How will our non-ascii shellcode look like to read the disk?
I've uploaded the assembly as a gist here.
It does a few more things than needed for this stage, but here's a basic rundown:
We first clear some registers, then initiate a drive read command with the interrupt 0x13.
The then read sectors get printed to the screen.
We do this by taking the byte (e.g. 0x3a), splitting it into it's 2 4-bit halfbytes 0x3 and 0xa, to then add 0x30 to them and print them seperately.
This all combined allows us to print characters like 0xa6, which we couldn't do without this encoding strategy.
So, to bring it all together:
1) compile the stage1 raw shellcode
2) generate asciified shellcode
3) load the bootBASIC image.
4) backtrack into the table of statements.
5) add custom statement that jumps somewhere into our line.
6) add our asciified shellcode to it
7) run the statement to run the asciified shellcode
8) ascii shellcode decodes into raw shellcode
9) raw shellcode reads flag from disk and prints it
Steps 1 and 2 are done manually with the gen.py script and nasm, the rest of the steps are handled by this script.
If we follow all of these steps now, put the correct parameters into gen.py, and run sploit.py, we will get the flag.
Mitigations
The only real issue here was the buffer underrun/underflow we were able to perform.
The assembly should check if the di register reached the line constant, and if so not decrease it on line 485 in basic.asm.
Other advice however, don't put assembly applications on the internet, it has virtually no security mitigations and can with a single flaw be exploited completely.
~sw1tchbl4d3, 29/05/2022 (dd/mm/yyyy)